1stwebdesigner |
| Twist That Code: How to Add Custom Buttons for WordPress TinyMCE Editor Posted: 28 Nov 2014 05:00 AM PST WordPress version 3.9 uses TinyMCE version 4.0 core, an open source HTML WYSIWYG editor by Moxiecode Systems, AB. This means that all of the buttons you see on your default theme posts and page editor comes from the TinyMCE plugin. WordPress TinyMCE editor version 4 provides comes with the following changes:
Using the TinyMCE Visual Editor has a lot of benefits as you don’t need to add styles or shortcodes manually. Instead, you can style elements in just a couple of clicks. Unlike other simple plugins, it may take some time to figure it out how to customize or add functionality to the TinyMCE editor. In this article, you will learn how to add custom button on your WordPress TinyMCE Visual Editor using the previous tutorial about creating tooltips shortcode. Resources You Need to Complete This TutorialWhat We Are Going to Build:
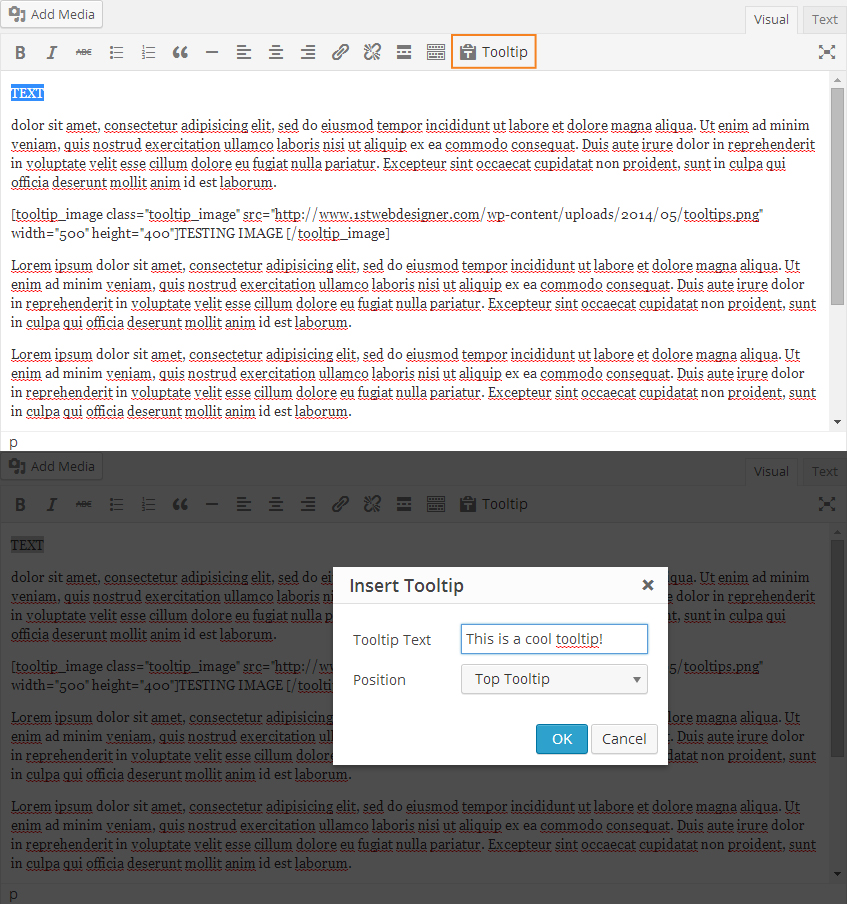
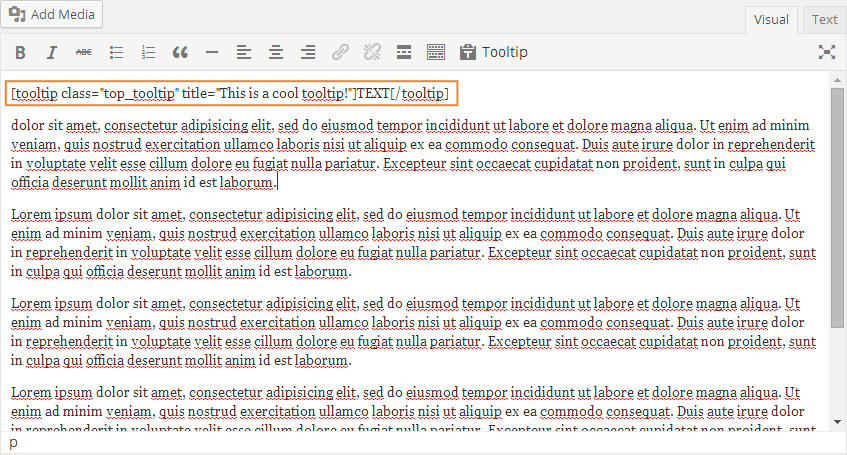
Getting StartedTinyMCE is great for Shortcodes. Most users are comfortable clicking buttons than putting codes manually to display a particular feature or style. You are going to use the following code to display a tooltip text along with its position. [tooltip class="top_tooltip" title="This is a tooltip"] TEXT[/tooltip] Now, see how you can add a custom button on the TinyMCE editor for this Shortcode. STEP 1 – Create a Function That Will Filter a Series of FunctionsThe first thing you need to do is to create a function that will filter series of functions. You will check if user has permissions and then check if TinyMCE is enabled before finally hooking it using the add_action function. Check out the codes below. // Filter Functions with Hooks function custom_mce_button() { // Check if user have permission if ( !current_user_can( 'edit_posts' ) && !current_user_can( 'edit_pages' ) ) { return; } // Check if WYSIWYG is enabled if ( 'true' == get_user_option( 'rich_editing' ) ) { add_filter( 'mce_external_plugins', 'custom_tinymce_plugin' ); add_filter( 'mce_buttons', 'register_mce_button' ); } } add_action('admin_head', 'custom_mce_button'); STEP 2 – Adding and Registering New MCE Plugin for WordPressNext, you will create another function to create the new custom button. The code will have the path of the JavaScript file that will handle the option of your custom button later on. In this part of the tutorial, you can name your JavaScript file as editor_plugin.js but, please, feel free to use any name you want for the file. // Function for new button function custom_tinymce_plugin( $plugin_array ) { $plugin_array['custom_mce_button'] = get_template_directory_uri() .'/editor_plugin.js'; return $plugin_array; } Then, register your new button using a new function. You will parse the variable buttons to make sure it will display the button that you’ve added above. // Register new button in the editor function register_mce_button( $buttons ) { array_push( $buttons, 'custom_mce_button' ); return $buttons; } STEP 3 – JavaScript for the Custom ButtonThe next thing you need to do is create the JavaScripts file that registers the custom_mce_button function. This will simply add a new button, that, when user click it, will display the text "Hello World!". (function() { tinymce.PluginManager.add('custom_mce_button', function(editor, url) { editor.addButton('custom_mce_button', { text: 'Tooltip', icon: false, onclick: function() { editor.insertContent('Hello World!'); } }); }); })(); OK, great! You've made it! But it's not done yet. The next series of codes will add the meaty part on your tooltip Shortcode. Replace the code above with the following codes. (function() { tinymce.PluginManager.add('custom_mce_button', function(editor, url) { editor.addButton('custom_mce_button', { icon: 'false', text: 'Tooltip', onclick: function() { editor.windowManager.open({ title: 'Insert Tooltip', body: [{ type: 'textbox', name: 'textboxtooltipName', label: 'Tooltip Text', value: '' }, { type: 'listbox', name: 'className', label: 'Position', values: [{ text: 'Top Tooltip', value: 'top_tooltip' }, { text: 'Left Tooltip', value: 'left_tooltip' }, { text: 'Right Tooltip', value: 'right_tooltip' }, { text: 'Bottom Tooltip', value: 'bottom_tooltip' }] }, ], onsubmit: function(e) { editor.insertContent( '[tooltip class="' + e.data.className + '" title="' + e.data.textboxtooltipName + '"]' + editor.selection .getContent() + '[/tooltip]' ); } }); } }); }); })(); The code that you see above will add a pop-up Window that will let the user add the tooltip text and its position. After highlighting the text, the user can click the tooltip button and this pop-up Window will appear. When the submit button is clicked, it will add or insert the tooltip Shortcodes along with the data the user inserted on the Pop-Up Window. Adding Icon to the Custom ButtonThere are two ways that you can add a custom icon for the custom button on TinyMCE editor.
Adding a Custom Image URL Path to Existing StylesheetTo add a custom image URL path to existing stylesheet, you will simply need to declare a class with the URL path of the image you want to use. i.custom-mce-icon { background: url('../images/tooltip.png'); } Next, you just need to add class you've just created to the icon option. (function() { tinymce.PluginManager.add('custom_mce_button', function(editor, url) { editor.addButton('custom_mce_button', { icon: 'custom-mce-icon', text: 'Tooltip', Creating a function to hook the icon’s URL pathTo display the icon using the function, you just need to add a function to load a new stylesheet for the admin panel use.Then, create the file and add class of the image and change the icon option to the class you just created. function custom_css_mce_button() { wp_enqueue_style('symple_shortcodes-tc', plugins_url( '/css/custom_style.css', __FILE__)); } add_action('admin_enqueue_scripts', 'custom_css_mce_button'); (function() { tinymce.PluginManager.add('custom_mce_button', function(editor, url) { editor.addButton('custom_mce_button', { icon: 'custom - mce - icon', text: 'Tooltip', What’s next?Adding custom buttons to TinyMCE is not that hard. I hope that this article helps you add a custom button to your WordPress Visual Editor. If you are not comfortable doing all this stuff, you might want to use the Custom TinyMCE Shortcode Button plugin. This allows you to add a custom button to TinyMCE which will insert a custom shortcode into the editor. Feel free to tweak and use the codes on your project. If you have any thoughts about this tutorial, just drop a line on the tutorial. |
| You are subscribed to email updates from 1stwebdesigner To stop receiving these emails, you may unsubscribe now. | Email delivery powered by Google |
| Google Inc., 1600 Amphitheatre Parkway, Mountain View, CA 94043, United States | |