Wednesday, December 31, 2014

Interactive Git Tutorials - Six Revisions

Interactive Git Tutorials - Six Revisions


Interactive Git Tutorials

Posted: 31 Dec 2014 02:00 AM PST

To be completely honest, I find Git to be a dry subject. But a version control system is essential to a modern dev workflow so I had to learn it. Any good VCS is fine but Git seems to be the most popular. So I went with Git.

What made learning Git easier for me were web-based interactive tutorials and online courses. They made the task more fun and engaging, which in turn made it less tempting to give up on. Plus they didn’t require me to install and configure Git on my computer, so I was able to explore and experiment right away.

Here’s a list of three free interactive tutorials that can help you learn Git. They are organized in order of difficulty, and I suggest using them sequentially from top to bottom.

Developers who use the following tutorials should be able to get their Git knowledge up to an adequate level.

1. Try Git

Try Git

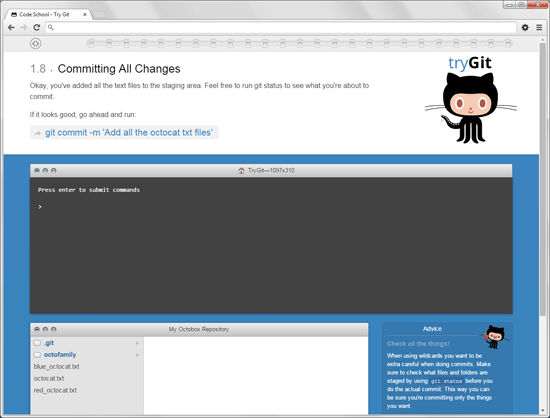
Try Git is an interactive tutorial that’s an excellent intro for first-time Git users. It goes over essential Git commands — the stuff you’ll likely use day-to-day — such as creating a Git repository, committing changes and working with remotes.

It’s a lightning-fast crash course designed to be completed in 15 minutes.

2. Git Real (Introduction)

Git Real (Introduction)

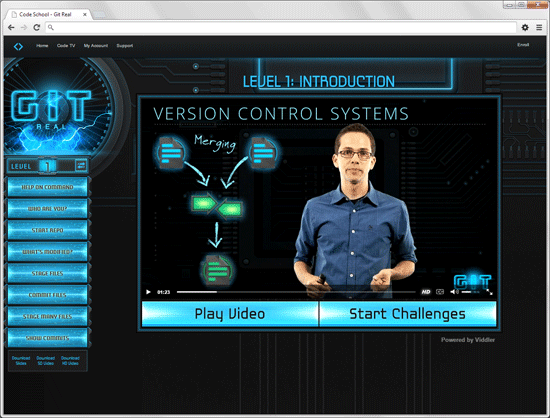
Git Real is an interactive online course on Code School. It has video instructions and provides hands-on interactive challenges.

Only the first level of the Git Real course (aptly named "Introduction") is free, but the level covers the key things you’d want to know about Git. Think of this level as a more detailed overview of Git compared to Try Git.

What I like about the entire Git Real course is it’s focused on things we’ll likely use during web development.

3. Learn Git Branching

Learn Git Branching

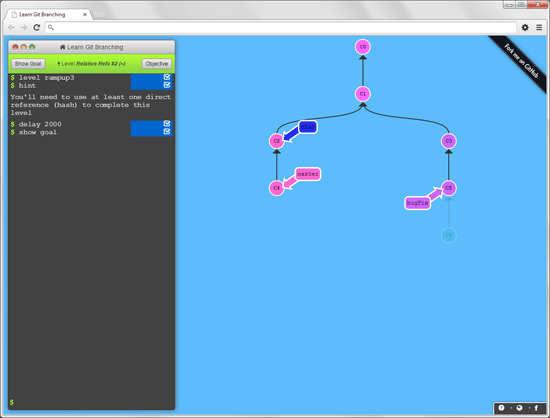
For me, the toughest Git concepts to understand are the source tree, source-tree traversal and branching. This web-based interactive Git tutorial helped me tremendously.

Learn Git Branching is divided into five parts that increase in difficulty, and each part has two to five modules in it.

Learning Tips

The following advice comes from someone who’s had to teach himself Git from scratch, up to a practical level of mastery.

Learn Git through the command line

It’s tempting to use a graphical user interface, and there’s nothing wrong with using a GUI later on to speed things up. And, as a visual person, I avoid command line interfaces as much as possible.

But learning Git through a CLI really helped me understand Git’s abstract concepts because I didn’t have any visual crutches to rely on (e.g. source tree diagrams).

Using a CLI is more challenging, and that’s a good thing because it forces us to slow down and truly absorb the material.

Also, getting comfortable with CLIs will help you later on when using other open source web components like CSS preprocessors, Node, Bower, Grunt and so forth.

Take your time

Anything worth doing, is worth doing right.

Most people with a programming background will be able to complete these interactive Git tutorials in a couple of days, and will have ample time to review and redo the trickier sections.

If you’re new to web development and programming, it might take longer, and you might need to read other Git tutorials outside the ones mentioned here to fill in any gaps. But I believe that’s OK because you’ll be learning a valuable skill that will save you time in the long run. Knowing how to use Git can also unlock new career opportunities, or at least give you an edge over candidates who aren’t familiar with version control systems.

Looking at learning Git as an investment in yourself is motivating.

Use Git in the real-world as soon as possible

Use Git in an ongoing dev project or the next available opportunity so you can instantly reap the rewards of your investment. Doing so will encourage you to move forward with Git, and give you the opportunity to practice the things you’ve learned.

Other things you can do right away:

  1. Clone an open source project from GitHub onto your computer and make modifications to it. Use branching to your advantage to keep track of changes.
  2. Release a small open source project on GitHub. It doesn’t have to be a full-blown web app framework or something — those will take a while to create and will thus defeat the purpose of this exercise. A simple UI component such as a navigation bar or a CSS demo are great places to start.
  3. Create pull requests on open source projects. It’s important to follow open source etiquette and the project’s own guidelines before doing this. To start, you can issue pull requests on my GitHub repos if you spot anything that needs to be fixed (thanks).

Related Content

About the Author

Jacob Gube is the founder of Six Revisions and a front-end web developer. Join him on Twitter @sixrevisions and Facebook.

The post Interactive Git Tutorials appeared first on Six Revisions.

Monday, December 22, 2014

1stwebdesigner

1stwebdesigner


One Little-Known ​Gesture That Could Affect Your Client Relationships Big Time

Posted: 22 Dec 2014 05:42 AM PST

There is one key practice that highly successful service providers do which sets them apart from all the competition.

What’s that one simple way you can improve client relationships, and can you make your work with them enjoyable?

We all have had bad clients, but who's really responsible for that? Remember that every client is a human, who wants to be heard, appreciated, taken care of. Give and you shall receive.

"Businesses have no emotion. People do."

I want to show you one simple and doable practice that will revolutionize the way you do client relationship management (CRM).

stevejobs

You're going to learn CRM the way Jobs did through this lesson. We're going to talk about a few things:

  • Ideas on client relationship management from people leading their industries
  • The disappearance of B2B and C2C marketing, and how everything is becoming about H2H marketing (human to human marketing)
  • How to earn your clients' trust and preference through one simple practice

Gone are the days when work is strictly work. Client relationship management has become a personal thing.

Gyro.com shares about how technology has forced B2B marketers to become more individualized in the approach by hitting the individual. As Bryan Kramer, CEO of PureMatter, places it well in his article for Social Media Today, "Businesses have no emotion. People do."

h2h

Business has to be more relational and less rudimentary. To become better in providing design services, we need to act more humanely. It's one thing that separates the design industry from other industries.

It's nothing far from what designers foundationally do. Conceptual professionals – designers, marketers, bloggers, etc.- are in the business of managing the perceptions and feelings of others. These are the professionals in making things human. Sadly, many creatives miss out on being human to their clients.

Salah Elkasef, introduces in his LinkedIn article, "H2H Marketing Reduces the Need for B2B and C2C Segmentation", the concept of human to human marketing. He says,

"While it is true that businesses do not have emotions, the people that are making the purchasing decision do."

Customer empathy has become necessary and vital in the way freelancers interact and market to potential clients and maintaining client relationships.

Elkasef also notes the disappearance of a B2B and C2C segmentation. B2B transactions are no longer supposed to be 'corporate' and 'heartless' in nature.

It's true that many large agencies and a majority of freelancers still remain to be lifeless in their approach. However, this approach is no longer what dominates the market. It is the personal approach that stands out.

Many large media companies such as Vaynermedia now approach client relationship management as a human thing, no longer as a blind, lifeless practice. Client trust and preference are the key. Gary Vaynerchuk, CEO of Vaynermedia, once wrote that empathy is one skill that many people should learn, empathy in the way they deal with clients and with personnel.

Trust and preference build not only for a large quantity of clients, but also high quality relationship with each client. Marketing Metrics notes that the probability of getting business from a new prospect is 5-20% whereas getting business from an existing client is 60-70%. In the long run, depth matters most. Trust and preference brings higher returns at lower costs and effort.

1047912_10151657224004487_1696367460_o

What is most surprising is that majority of people are human only in their execution, and not in the way they do business.

A large number creatives and designers practice their human voices in the way they execute content marketing, design, writing, promotions and user experience and then treat their clients as issues, not people.

Kristin Smaby in her article "Being Human Is Good Business" points out three strong points about how to treat customers:

  • A customer is not an issue or a channel.
  • A customer uses channels to communicate issues.
  • A customer is a human being.

This is greatly influenced by the traditional notion of 'business being non-personal' and seeing it unfit to be friends with business partners or clients. It's surprising how much your competition does not see the need, or- even worse- treat as a taboo the idea of being friends with clients.

So here's the burning question for everyone:

"Why do most freelancers perform SEO, design and improve user experience in a human way, and  do client relationship management in a non-human way?"

The compelling case? It's this simple: You can be friends with your clients.

Robert W. Dempsey puts it well when he asks the question- "What fear drives us to believe that we cannot be 100% ourselves with our customers, and that we must put up a facade in order to attract people to our businesses?"

Human relationship simplifies everything in client relationship management because it injects the trust factor. And, boy,trust a big deal in the industry.

The key to long term engagements with clients is the level of trust that you and your client share.

Trust and preference come in a package called relationship. To build trust, we cannot be disconnected with our clients- both existing and potential. And in a relationship, everything counts.

From the big things, such as ROI, better visual branding, delivering on time, down to the small things, clients will trust designers who hit all areas. Some of the small things clients appreciate include placing captions on wireframes, personally liking the client's social media posts, and even greeting them on holidays. Sadly, so many designers miss the small things.

 Yes! Greeting clients on holidays. It's a small practice, but it is one that will revolutionize the way you handle relationships with clients. It has increased the level of trust clients have for me. Ever since I started greeting clients on holidays, birthdays, name days, most, if not all of clients have stayed longer for services.

Here’s an example of an email I sent out to one of my longest and biggest client, Zap.com.ph, as a Christmas greeting last year.

trust and preference example

The Operations Director, Dustin Cheng, has now become more than a client. I have established with him a human-to-human relationship and not simply a business-to-business one. Zap has been a client for more than two years now. Aside from that, he has also referred countless other people to me for work!

I believe that sending out greetings is an effective, simple and sustainable practice for client relationship management. This is so for two reasons:

  • It helps designers stay relevant. Greeting our clients communicates connection and relevance, that we are not just machines that cough-up PSDs and codes. We are people who value our clients.
  • It makes the client feel human. When they feel human, they start acting humanely. They become more forgiving when you make mistakes, more generous when you inform them of increases in rates, when you screw up a scheduled meeting with them and so on.

1WD's challenge is to have everyone apply this simple practice during the holidays. 1stWebDesigner is giving out a free Christmas card (in various formats, download zip file) for all you designers to download and personalize for your clients. Be as personal as you can with your messages.

trust and preference built through christmas greeting

Here’s an example of what the Christmas Card template 1stWebDesigner is giving out looks like. It comes in various preset colours, and there are five pre-made quotes as well that you can choose from.

colors

The application is simple but not easy. Imagine having to break the status quo. Your client will find it weird. Your partners will find it weird. Even you will find it weird at first! But once you get a hang of it, it becomes life-changing.

You'll be surprised at how much a simple greeting can do for your career, and client relationship management problems. Your CRM problems will decrease by half!

Human relationships are the key to long-term and successful partnerships with your client. If you get that right, you'll be an industry leader in no time. Yes it's important to be great at delivering, but personal relations will trump the business side anytime of the day.

Enjoy everyone!

In case you missed it, click here for the free christmas card template. Tell us what you think of them by putting your comments below!

Top 10 Free Online RSS Readers - Six Revisions

Top 10 Free Online RSS Readers - Six Revisions


Top 10 Free Online RSS Readers

Posted: 22 Dec 2014 02:00 AM PST

After restarting my RSS subscriptions, I’ve been on a constant lookout for good RSS readers. There’s an overwhelming amount of them out there, an aftermath of a race to fill the void Google Reader left when it was shut down.

Here’s a review of the 10 best free online RSS readers I’ve come across so far.

1. Digg Reader

RSS reader: Digg Reader

Digg Reader is a free online RSS reader that has a clean user interface and all the features you need for reading and managing your RSS feeds. This RSS reader integrates with other web services such as Instapaper so that you can bookmark posts that you want to read later.

2. Feedreader Online

RSS reader: Feedreader Online

Feedreader Online is a simple and free RSS reader. It has two types of viewing modes, a feature called Starred Items for saving RSS feed items, and a filter for displaying unread items. In my opinion, these are truly the only features you need for a good RSS reading experience.

3. CommaFeed

RSS reader: CommaFeed

CommaFeed is a free RSS reader inspired by the now-defunct Google Reader. This RSS reader is open source; you can download its code and host it on your own server.

4. FlowReader

RSS reader: FlowReader

FlowReader is what you’d get if you combined RSS and social media. It’s a great option for people who want to see all their content sources in one place.

5. Feedly

RSS reader: Feedly

Feedly is an online RSS reader with a clutter-free user interface. It has an Add Content feature which aids you in quickly finding new content sources to subscribe to. Though Feedly is free to use as-is, it does have a paid subscription plan that costs $5 a month. The paid plan unlocks some more features such as integration with web apps like Evernote and Dropbox.

6. Inoreader

RSS reader: Inoreader

Inoreader is a feature-rich RSS reader that has a ton of configurable options. For example, it lets you craft custom rules that will perform actions such as "Send to email" or "Send to Instapaper". It has four view modes and four UI themes. Beyond Inoreader’s free subscription plan, it has paid subscription plans that start at $2.99 a month.

7. Feedspot

RSS reader: Feedspot

Feedspot is a free RSS reader with an integrated search feature that allows you to search your content sources. It can recommend sites to subscribe to based on your interests. Feedspot has a paid subscription plan that costs $24 a year, and it gives you an advertisement-free experience.

8. The Old Reader

RSS reader: The Old Reader

The Old Reader has all the features you expect from a good RSS reader: Keyboard shortcuts, various viewing modes, all that good stuff. One thing that makes it different is it’s also a social network: You can connect with other users and share content with each other. The Old Reader is free for up to 100 subscriptions, then you’ll have to upgrade to a premium subscription plan that costs $5 a month.

9. G2Reader

RSS reader: G2Reader

G2Reader is another RSS reader that has the essentials. G2Reader is free only up to 100 subscriptions. It will cost $29 a year beyond that.

10. Good News

RSS reader: Good News

Good News aggregates all your content sources in one place. This means you can read your RSS, favorite sites, and social media in a centralized way. It has a total of 12 alternative viewing modes for your convenience.

Summary

The RSS reader I’m currently using is Digg Reader. Digg Reader has a clean user interface, is lightning fast, and works well on laptops/desktops (which is where I read my RSS). But I constantly review my options to make sure it’s still the right tool for the job. Feedreader Online is another option that matches my needs.

Some people need a more comprehensive web-content-reading experience. My two suggestions for all-in-one content readers are FlowReader and Good News.

If you’re concerned about privacy, you can host your own RSS reader using the free and open-source CommaFeed.

Related Content

About the Author

RSS reader: Jacob Gube is the founder of Six Revisions. He’s a front-end web developer. Follow him on Twitter @sixrevisions.

The post Top 10 Free Online RSS Readers appeared first on Six Revisions.

Saturday, December 20, 2014

CSS Link Pseudo-classes - Six Revisions

CSS Link Pseudo-classes - Six Revisions


CSS Link Pseudo-classes

Posted: 19 Dec 2014 06:52 PM PST

Link pseudo-classes give web designers the ability to style various states of HTML links.

The CSS pseudo-classes commonly used for styling hyperlinks are :link, :visited, :hover, :active, and :focus.

Example:

/* Default */  a {    color: blue;  }  /* Unvisited links */  a:link {    color: blue;  }  /* Visited links */  a:visited {    color: purple;  }  /* Hover state */  a:hover {    color: red;   }  /* Focused state */  a:focus {    color: orange;  }  /* Activated state */  a:active {    color: green;  }

Overview

Here’s a description of each pseudo-class:

  • :link – selects unvisited links.
  • :visited – selects visited links.
  • :hover – the state that happens when the user places their mouse pointer on top of a link.
  • :active – the state that happens when the user clicks on a link. This is the very brief moment between clicking on the link and becoming focused, or the moment between clicking and then going to another web page. Because this state normally lasts for a short duration, you can see this state easier when you click-and-mouse-down on a link without releasing the mouse button.
  • :focus – the state that occurs when the user focuses on the link. This state can be seen when you tab to a link, or after you click on a link.

Technically, out of the five most commonly used pseudo-classes for links, only two — :link and :visited — are actually the link pseudo-classes that are specifically designed for HTML link (<a>) elements.

The other three — :hover, :active, and :focus — are called dynamic pseudo-classes and can be used on other HTML elements.

Combining Pseudo-classes

For greater CSS specificity, you can use a combination of pseudo-classes.

For example, you may wish to have a different appearance when a user hovers over a visited link versus an unvisited link.

a:link {    color: blue;  }  a:visited {    color: purple;  }  a:link:hover {    color: green;  }  a:visited:hover {    color: red;  }

In the preceding example, when users hover over an unvisited link, its anchor text will become green. But if it’s a visited link, the anchor text will become red.

Order of Pseudo-classes

Because of CSS specificity, links can match multiple pseudo-classes at the same time. This is the reason why the order of style rules in your stylesheets is crucial.

An example where two pseudo-classes are matched at the same time is when a link is clicked on. At the start of the click event, the link briefly matches both :hover and :active states because the mouse pointer is still on top of the link while the link is being activated.

We know that if two selectors are equal in specificity, by default, the selector further down the stylesheet wins. Thus, if the :active style rule is above the :hover style rule, users will never get to see the :active style rule applied because the :hover style rule supersedes it.

So that all link pseudo-class style rules are rendered successfully, this is the suggested order:

a { }  a:link { }  a:visited { }  a:hover { }  a:focus { }  a:active { }  

Case-insensitivity

W3C’s pseudo-class specs permit any type of casing style. This means writing pseudo-class names in all-caps, all-lowercase, or any other casing style will work.

However, the prevailing best practice is to write pseudo-class names in all-lowercase.

All of these :link pseudo-class variations will work and are technically equivalent to each other:

a:link { }  a:LINK { }  a:LiNk { }  a:lInK { }

Spacing Characters Before and After Pseudo-class Names

There can’t be any spacing characters before and/or after the colon (:) preceding the pseudo-class name.

For instance, writing your style rule as such won’t properly render in browsers:

/* Spaces before and after the colon (:) won't work */  a : link {    color: green;  }    /* Spaces before the colon (:) won't work */  a :link {    color: green;  }  /* Spaces after the colon (:) won't work */  a: link {    color: green;  }

Link Pseudo-classes in Modern Browsers

In modern web browsers, :link and :visited will behave differently from other pseudo-classes in order to protect the privacy of a visitor’s browsing history.

Modern browsers now limit the CSS properties that will be rendered in style rules that involve the :link and :visited pseudo-classes.

In short, the style rules for :link and :visited cannot differ except for their color properties. For instance, you can’t assign them different background-image values or give them different display values.

In modern browsers, the following example will not behave as you’d expect. Visited links will not render in all-caps; they will be in all-lowercase just like unvisited links.

HTML

<a href="#unvisited">Unvisited LINK</a>  <a href="#visited">Visited LINK</a>

CSS

/* Unvisited links are told to render in all-lowercase */  a:link {    text-transform: lowercase;  }  /* Visited links are instructed to render in all-caps */  a:visited {    text-transform: uppercase;  }

Result

Link pseudo-classes demo: visited links and unvisited links are rendered the same way except for color

For a full explanation of the issue with :link and :visited pseudo-classes, read this article: Why the :visited Pseudo-class is Strange.

Related Content

About the Author

Jacob Gube is the founder of Six Revisions. He’s a front-end web developer. Follow him on Twitter @sixrevisions.

The post CSS Link Pseudo-classes appeared first on Six Revisions.

Friday, December 19, 2014

1stwebdesigner

1stwebdesigner


What You Should Tweak in Your WordPress Theme Options Page (But Forgot)

Posted: 26 Nov 2014 04:00 AM PST

Every website or blog needs some modification in its theme. Only then can you make your blog to stand out from the crowd and bring traffic to it.

WordPress theme options page is a custom admin page that allow users to change theme settings without modifying the theme files. These theme option pages can be simple or have lots of customization split into either tabs or multiple pages.

Theme options are good for majority of the users; however, these options do have a tendency to confuse things on the development side. So if you are a WordPress site developer, here are some of the options that you should be including in your WordPress theme page option. Moreover, the article explains why you should include these features in the WP theme options page.

Avada is the best selling theme on ThemeForest, we are using it as example in this article. We have covered the most important options below. For further information, you can also check complete documentation here.

General Options

Responsive Option

General Options will let people control the look of their site. There are three main sections in this option: Responsive Options, Favicon Options, and Tracking Options

  • Responsive Option – needed to make your website design layout responsive or fixed. Responsive design will adjust your website on different devices, whereas fixed layout is for users who want to display the site in fixed width.
  • Favicon Option – needed to associate an icon with your website URL that represents your website's favicon.
  • Tracking Option – adds a track code into the footer template of your theme that allows people to use services like Google Analytics, among others.

Header Options

Header Option

The Header Option lets users customize everything above the content area, including the menu. It has three main sections: Header Content Options, Header Background Options, and Header Social Icon Options.

  • Header Content Option – needed to change header design, slider position, transparent header and website's logo, etc.
  • Header Background Option – required for inserting background image in header. Users can choose various options like, repeat and even modify the heading top and bottom padding.
  • Header Social Icon Option – needed for customizing the social icons that are displayed in header.

Footer Options

Footer Option

The Footer Options help in customizing the different areas of website footer. The footer tab has two sections: Footer Widget Options and Footer Copyright Option.

  • Footer Widget Area Option – needed if you want to set number of footer columns. This option will let you insert an image URL for footer widget area background.
  • Copyright Area Option – useful for displaying copyright text in footer. This option will also will also help you in displaying social icon on footer of page (if you want).

Background Options

Background Option

The Background Options will let you change background for box and wide mode layout.

  • Background Option for Boxed Mode – needed for changing the background colors and pattern. This option is also recommended to change the background image and how the image repeats.

Typography Options

Typography Option

The Typography Options let you to customize fonts. There are five sections in it: Custom Font for the Navigation Menu and Headings, Google Fonts, Standards, Font Sizes and Font Line Heights.

  • Custom Fonts – needed to use custom fonts instead of Google and Standard fonts.
  • Google Fonts – integrating Google Fonts lets the user choose fonts for body, menu, headings, and footer headings for Google Font directory.
  • Font Size – needed to change font sizes for different areas of the theme page including sidebar widget, footer widget and copyright font size etc.
  • Font Line Height – allows setting font line for body and heading of theme page.

Styling Options

Styling Option

The Styling Options are needed to customize the colors of your website. This option has five sections: Background Colors, Element Colors, Element Options, Font Colors, and Menu Colors.

  • Background Color Option – needed to modify colors for several page items including header, content, footer and copyright, etc.
  • Element Colors Option – lets user control the colors for button, sliding bar, footer widget, form, blog grid and social share box, etc.
  • Element Option – used to disable button text shadow, sliding bar text shadow and footer text shadow.
  • Font Color Option – needed for controlling the text color of buttons, header tagline, heading, body, link, sliding bar, footer heading, and footer font color, etc.
  • Menu Color Option – gives you the complete control over colors for menu background, font and header.

Blog Options

The Blog Option can be good if you need to publish blog posts related to the content. It can also be used for customizing different blog aspects such as layout, sidebar, excerpts and date formats, etc.

  • General Blog Option – allows you to choose the title, layout, sidebar position, excerpt length and pagination, etc.
  • Blog Single Post Page Option – allows you to have a featured page with no sidebar and other distracting content.

Portfolio Options

Portfolio options enable user to customize different aspects of portfolio page, such as the number of items per page, sidebar, excerpts and more.

Social Media

Social Media

Social media options can help if you want to display the social icons on your site. These will help grow your social presence; also, they will add to your network marketing efforts.

Contact Page Options

Contact Form

Most people use custom contact form plugins, but having a built-in option can be helpful for non-techie individuals. These options let you customize the contact page on your blog. This option has two sections: Google Map Options and Recaptcha Spam Options.

  • Google Map Option – added if you want to show a Google map, and having direction to your business address. This option also allows you to set the width and height of  the map.
  • ReCaptcha Spam Option – helpful for securing your blog or a website with public and private ReCaptcha.

Sidebar Options

Sidebar options are needed for customizing the width of the content area and sidebar. This option is also needed if you want to choose sidebar background colors to match your content.

Custom CSS Options

Custom CSS option will be needed if user wants to overwrite or add new CSS properties to the theme. The HTML themes cannot be modified; however, custom CSS provides the power to create a custom design.

Conclusion

Every popular WordPress Theme has a powerful options panel. It offers a great way for customizing the page that can be managed and understood easily. Many users don't know what a CSS is but, they can easily use these options to change colors, headings, fonts, and more.

Any developer who is creating a website or a blog on WordPress should consider these options for the theme option page. Which of these options have you included in your theme option page? Please share your thoughts in the below comment section.