Thursday, July 31, 2014

1stwebdesigner

1stwebdesigner


Is My Website Ready for Some Serious Hacks?

Posted: 31 Jul 2014 06:00 AM PDT

The issue of website security has been a top priority for web designers and developers for a long time. In the course of Internet's colorful history, a lot of methods and tools have been developed (and some are still at the brink of development) to ensure that websites will be hack-proof, or at least be ready for some serious hacks.

What drives all the motivation to lock-down websites is, of course, business. As we all know, websites drive income and leads for a lot of companies.

These companies thrive to target the new market. This market mainly resides in the digital world, to further increase their chances of conversion – and in the near future – income.

On the other hand, some websites prosper mainly from driving traffic and converting clicks into cash. Blogs are great examples. They mainly sell information, which can be used to create tangible and perceivable products.

hacker

Either you may be designing an online store, a niche blog, or maybe even just a corporate website, protection should always be put in mind.

Now, as a web designer/developer, you are tasked to not only create beautiful and running web pages but also to keep it protected from parties that would want to penetrate and take advantage of it. You need to enforce security measures to prevent the dreaded situation of being hacked.

There are a lot of ways of hacking a website. By this, many measures should be implemented to prevent these unfortunate situations. However, there is no single fool-proof way to prevent and eradicate hackers. The best thing you can do is to make the invasion really difficult to a point where the hacker just gives up.

In this article, you will know the measures you could take to make your website ready for a possible breach. You will also be reading some of the most common techniques hackers use to compromise your website's security.

Common Hacking Methods

As I've said, there are various methods in penetrating through a website's security. Hackers employ these methods to destroy or manipulate the website they are about to hack. We are introducing these to you so that you can apply your security measures to prevent and fight such shenanigans.

SQL Injection

You cannot deny that SQL Injection is listed as one of the most dangerous attacks against websites and systems. It mainly involves the input of SQL codes into forms like login fields or even in the browser address field. Doing so will give the hacker access to the database of the website or system.

Once you enter your username and password in the login forms, the data that you are keying will be inserted into an SQL command. The said command will check the data that you just entered and compare it against the relevant table in the database.

Once the two values match, you will be granted access. Otherwise, you'll not be able to log in.

evil-person-with-syringe

SQL Injection attacks happen when a hacker tries to paste SQL commands into your website fields. In some normal cases, the website will just check the data being entered by the user and validate it.

In the event that a data contains  a simple single quote (') at the end of a username, your database might see this one as a constructed SQL. Because of this, it will be validated as a query.

The hackers may not enter your website using this query, but the method will let them have access to your database name, tables and key fields. From these data, the hacker can now use the information he has to submit SQL commands into the other fields of your website. From then, they can see the contents on your database.

How do I defend my site against this?

  • Ensure correct data types
  • Parametrized queries
  • Permissions
  • IIS global filtering
  • Leave validate request on
  • Consider using an ORM

Cross Site Scripting (XSS)

Commonly known as XSS, Cross Site Scripting is one of the more difficult hacks to deal with. In the past years, Microsoft, MySpace and Google have had a difficult time dealing with such cases.

XSS deals with the use of malicious JavaScript routines that are attached within hyperlinks to take control over sessions, hijack ads in apps and steal personal information.

You will surely remember this: You accidentally clicked a weird looking pop up and it leads to a website that seems like a messenger app. Then a cute girl with a seemingly questionable English chats you up and says, "You wanna see my p*ssy? Click here."

With the what-the-hell-she's-hot-anyway mentality, you click the link and an address with a sketchy URL appears:

[%63%61%74%69%6f%6e%3d%274%74%70%3a%2f%2f%77%7…]

At some point, you may think nothing has happened. But boy, you have never been so wrong in your life. These links can help steal session cookies (sounds like you're being bullied) that can possibly lead to hijacking your personal information.

hackerr

How do I prevent this hack from happening?

  • Never insert untrusted data except in allowed locations.
  • HTML escape before inserting untrusted data into HTML element content.
  • Attribute escape before inserting untrusted data into HTML common attributes.
  • JavaScript escape before inserting untrusted data into JavaScript data values.

Authorization Bypass

Simple as it may present itself, authorization bypass is very scary! Often used against poorly designed apps or CMS, this hack can wreck a total havoc in your website.

It works in this simple process:

  1. Look for a weak and poorly secured log-in page.
  2. View the source code.
  3. Copy the code into notepad.
  4. Delete the authorization JavaScript and change a link or two.
  5. Save.
  6. Delete the authorization JavaScript, amend a link or two.
  7. Open the file into the browser, login and press enter.
  8. Voila. Access!

How to determine if my website is vulnerable?

Depositphotos_24543141_m

  • Are your server's processes run on root, Administrator, LOCAL SYSTEM or other privileged accounts?
  • Does your web app access the database via SA or other accounts?
  • Does your application have the ability to access the database via accounts with more privileges than required?
  • Do your application server virtual machines run with AllPermission or FullTrust in J2EE and .NET environments?
  • Can you limit access to web resources using platform capabilities?

If yes, to even just one, then, you might be vulnerable.

Read more here: Owasp

How can I protect my website?

  • Your website's development, test and staging environments should be set up using the lowest possible privilege.
  • Make sure that the accounts that run the environment have privileges capping up to the greatest degree possible. Your servers should never run Administrator, root, sa, sysman or supervisor processes.
  • Limit your user accounts to enough privileges corresponding to their tasks.
  • Business user accounts should not be given admin status and vice versa. You need to use different accounts for different tasks.

Now, there are many types of hacks. The most common hacking techniques have been discussed. If there are something missed, please lead to the following links for more detailed information:

Common Safety Measures to Prevent Hacks

Always Keep Your Plugins and Software Up-to-Date

update

Nothing can make a hacker's ears clap than an outdated plugin or blogging program. They commonly fall as easy targets for outdated programs commonly have glitches, bugs or security loopholes. That is the main reason why they are updated in the first place.

Let's put it this way, you are using a model of a door lock that has been lockpicked a thousand times. Would you expect the next lockpicker to have a difficult time in cracking your security?

So, heed this advice, update now.

Use Strong Passwords

strong-pw

How many times does this have to be stressed out? Using strong passwords is very important. You may not have an idea about this but hackers are continually trying to crack or steal your passwords..

So, how do we craft an effective password?

  • Salt Method

Salt Method is a great way to keep your password secure. According to the principle, you should replace letters or numbers into special characters according to your own rule. We put this as an example.

  • Replace all the 'a' with @
  • Replace all the 's' with $
  •  Repalce any space with %
  • Replace any 'o' with 0
  •  Replace any 'i' with !

So with this, we may make our sample password which is originally 'whoisjohngalt' as 'wh0!$j0hngalt'.

  • Business Insider's Method

Business Insider recently released a method to create secure passwords that can be very easy to remember. According to the magazine, you should make a longer password because it will give computers longer time to guess it.

The basic principle of this method is that you create a really long passwords using words that may not be significant to you or to each other.

  • Spence's Method

We at 1stwebdesigner have also developed our own method of creating strong passwords. Here is a video of it:

Use Google’s Webmaster Tools

Google-Webmaster-Tools-Logo

Google has now a way in helping your website to be more secured. Using Webmaster Tools, you will be notified for the presence of malicious infections.

In case that you fail to remove them and you become hacked, Google will help you by blacklisting your website. This provides you time to get rid of malware faster. The service also includes the details of the problem Google is detecting.

Don't Display WordPress version number

wordpress-version-number-3

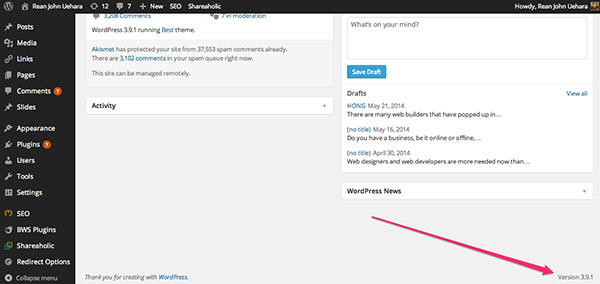
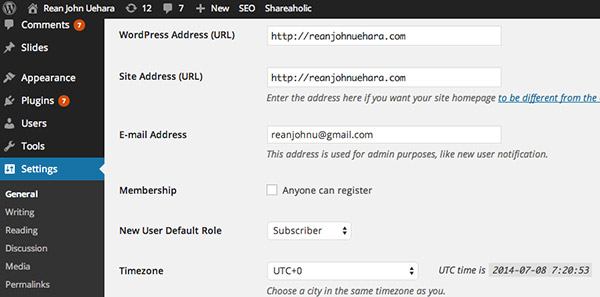
Aside from updating your blog platform, you should always prevent hackers from knowing what version of WordPress you are running on.

Doing this will prevent them from exploiting security loopholes on your site. You can remove the WordPress version number by editing the functions.php of your site and add the following code:

  function wpbeginner_remove_version() {  return '';  }  add_filter('the_generator', 'wpbeginner_remove_version');    

Turn register_globals to register_globals=off

Screen-Shot-2014-07-08-at-3.21

Many WordPress users have been vulnerable because they took this for granted. Despite being recommended by WordPress.org to leave register_globals on, you should turn it off because this setting has been the commonly hacked element in a WordPress site.

Tighten your .htaccess file's security.

Screen-Shot-2014-07-08-at-3.21-FTP

Normally, your default .htaccess security is more open that it should be. However, you can tweak it to save you from URL hacks, SQL injections and other more hacks.

There are a lot of ways to tweak your .htaccess, but we'll name the most useful ones (remember to back up):

  • Order allow,
  • Deny deny from all

Add the following and you will be able to sleep tight at night, knowing that bots and unwanted access will not be allowed from your wp-admin.php file. You can also include this method to other files like install.php and eror_log.

Here are a few more codes to put in your .htaccess file.

    RewriteEngine On    RewriteBase /    RewriteCond %{REQUEST_METHOD} ^(HEAD|TRACE|DELETE|TRACK) [NC]RewriteRule ^(.*)$ - [F,L]RewriteCond %{QUERY_STRING} \.\.\/ [NC,OR]RewriteCond %{QUERY_STRING} boot\.ini [NC,OR]RewriteCond %{QUERY_STRING} tag\= [NC,OR]RewriteCond %{QUERY_STRING} ftp\: [NC,OR]RewriteCond %{QUERY_STRING} http\: [NC,OR]RewriteCond %{QUERY_STRING} https\: [NC,OR]RewriteCond %{QUERY_STRING} (\|%3E) [NC,OR]RewriteCond %{QUERY_STRING} mosConfig_[a-zA-Z_]{1,21}(=|%3D) [NC,OR]RewriteCond %{QUERY_STRING} base64_encode.*\(.*\) [NC,OR]RewriteCond %{QUERY_STRING} ^.*(\[|\]|\(|\)||ê|"|;|\?|\*|=$).* [NC,OR]RewriteCond %{QUERY_STRING} ^.*("|'|<|>|\|{||).* [NC,OR]RewriteCond %{QUERY_STRING} ^.*(%24&x).* [NC,OR]RewriteCond %{QUERY_STRING} ^.*(%0|%A|%B|%C|%D|%E|%F|127\.0).* [NC,OR]RewriteCond %{QUERY_STRING} ^.*(globals|encode|localhost|loopback).* [NC,OR]RewriteCond %{QUERY_STRING} ^.*(request|select|insert|union|declare).* [NC]RewriteCond %{HTTP_COOKIE} !^.*wordpress_logged_in_.*$    RewriteRule ^(.*)$ - [F,L]    

Source: RoalCoal

My Website Has Been Hacked. What Should I do?

Say that it's too late and you have already been hacked. What would you do?

Don't start banging your head into the wall yet. Smashing Magazine has this wonderful article. Read it.

Conclusion

Being hacked sure is a headache. You basically see your efforts crumbling down like a tower made of pastry. But an ounce of prevention will always be better than a pound of cure. So, while you're still okay, fix everything you need to fix before it all goes gaga.

Wednesday, July 30, 2014

1stwebdesigner

1stwebdesigner


Money Saving Tips for Web Designers and Developers

Posted: 30 Jul 2014 06:00 AM PDT

Freelancing has its perks, especially when we talk of freedom and flexibility. With all the liberty you have, you can do more projects and allot more rests. You also have the prerogative to work anywhere you want. Freelancing is a great career to step into but it has its drawbacks.

  •         You work alone most of the time.
  •         You deal directly with clients.
  •         You need to have a rich artistic bank.
  •         You are more prone to procrastination.
  •         Your budget is should always be planned.

Related post: How to Ace Your Freelancing Career

Of all these drawbacks, it's the last one that hurts freelancers the most.  There are lots of articles on money saving tips. But which focuses entirely for web designers and developers?

When you freelance, you take matters into your own hands: getting clients, working on deals, doing the project, and everything you could ever think of.

broke-designer

But what really becomes the problem is budget.

Yes, we earn a lot of cash in this field, especially if you are already a seasoned designer and really taking a huge number of projects. Sometimes you go spend a lot simply because you earn a lot too. You unconsciously increase your standard of living.

And one day, you'll realize, that in hard times, you're flat-as-a-tire broke.

What the hell happened? Yesterday, you were earning big bucks. And suddenly projects run dry, and your creativity goes on a drought. You look at your pocket and find only a couple of dollars.

Well, maybe the answer to the 'what-the-hell-happened' question is: YOU DID NOT SAVE.

Financial saving is important because it makes you ready for the unforeseeable future. Who knows what might happen tomorrow, right? So as early as now, you have to make sure that you have enough when that tomorrow comes. Make sure that you are ready when it hits you.

Here are a few tips:

The Archer Mentality

archer

"A great archer (marksman) saves his arrows for bears and not for rabbits"

I have this way of thinking called the Archer Mentality. Archer Mentality's main philosophy is rooted on saving for the things that matter. As a freelance web designer, consider these:

  • Which of the expenses will you really need?
  • Is this premium plugin worth it?
  • Is this software really precious as it sounds to be?

Remember, you have to identify which of your needs is necessary for your work (or for your daily living for that matter). If it's unessential, scrape it off! That's the minimalist way of thinking, right?

Start looking for more free tools. Yes, free software and UI kits may not be as good as premium ones but you can always be innovative and resourceful. There are ways to cut the costs.

Shoot your arrows for bears. If it's not a bear, then, it's not worth an arrow.

Here are a few other related articles:

Doubt Everything

doubt-everything

Doubt may be a bad habit for success stories, but it sure is necessary. All successful men have gone through doubting themselves. This can also be applicable in saving money. Try the following doubt-methods:

  • When you feel like spending, compare the product you want to buy with the total number of hours you will be working for it. Say, you want to buy a pair of $300 shoes and you are earning $20 an hour. Will you be willing to spend 15 hours on that shoe?
  • Put reminders on your wallets and card holsters. Reminders like "You are saving for a car" that you can see just as you would get cash or draw your card. It would really help you re-think whether or not you will spend your cash.

Here are a few other articles that might help you:

Be a Freebie Finder

finding-freebies

Freebies are the greatest thing about the Internet, aside from cats, perhaps. Freebies help freelancers a lot. Because of freebies, you don't have to worry about thinking of a design and not being able to execute it. The tools you need are free! Elements like pictures, UI kits, templates and fonts can be found all over the web and you can choose from them.

Sometimes, it's not the price of the element that matters but it's how you creatively use them.

Here is a list of some of the 1WD Freebies:

Plan Your Education

placeit

As a freelancer and worker of the Web, you have to update your knowledge. Doing so will increase your potential to be hired because your clients know that you have the idea about the latest trends and techniques in your field.

Courses can be very costly at times, and sometimes, there are courses that really don't make any sense in your field. That is why you have to plan your education. You have to schedule your updates to both save money and time. You just can't go on deciding that you want to take this $1000 course on something.

Here are a few tips:

  • Create a list of things you really need to learn.
  • Know which of these items are discounted. If you think the discounted prices are reasonable, then, take them.
  • Don't go course-hopping. Choose what you really need.
  • Remember to read reviews. Make sure the course you'll take are worth the bucks you spend.
  • Be mindful of scammers. Take courses from trusted online resources.
  • If there are free courses, take them.

More to learn here:

Conclusion

Saving money is not always easy. It's darn hell painful. That is why you need a lot of discipline on this. But always remember that the sweetest fruits of success come from the bitterest of roots. Don't just be a happy-go-spend person, save for the rainy days. Good luck.

Do you have any money-saving methods to suggest? Let us know.

Tuesday, July 29, 2014

1stwebdesigner

1stwebdesigner


Make Shapes with CSS: How to Create Different Shapes in CSS

Posted: 29 Jul 2014 06:00 AM PDT

One of best cool features of CSS3 is that it reduces the use of images in web designs and allows you to create different shapes in CSS. Commonforms that you usually see in Photoshop or Illustrator can now be done using CSS3. New CSS properties like transform and border-radius add complexity with shapes instead of creating them in drawing applications.

In today’s tutorial, let's create a simple list of the most common shapes that can be done using CSS3.

Resource you need to complete this tutorial

  • Knowledge in CSS3
  • Time and Patience

Circle

circle

HTML

To create a circle in CSS, first we need a div and give it an ID name of the shape. So for this example, set circle as the ID name.

    <div id="circle"></div>  

CSS

For the CSS, simply put a width and height and then give it a border radius half of the width and the height.

  #circle {      width: 120px;      height: 120px;      background: #7fee1d;      -moz-border-radius: 60px;      -webkit-border-radius: 60px;      border-radius: 60px;  }    

Square

square

HTML

To create a square shape in CSS, just like the circle shape, we need a div and give it an ID name of the shape. So, for this example, set square as the ID name.

    <div id="square"></div>  

CSS

For the CSS of square, simply set up a width and height of equal value and provide a value making it look visible.

  #square {      width: 120px;      height: 120px;      background: #f447ff;  }  

Rectangle

rectangle

HTML

To create a rectangular CSS shape, just like the square shape, set-up a div with the ID name rectangle.

    <div id="rectangle"></div>  

CSS

Just like the square shape, we will put a simple width but this time larger than the height.

  #rectangle {      width: 220px;      height: 120px;      background: #4da1f7;  }  

Oval
oblong

HTML

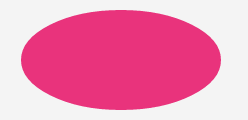
To create an oval in CSS, create a div with the ID name oval.

    <div id="oval"></div>  

CSS

Oval is almost similar with circle shape; however, the oval is rectangular in shape and will need a radius that is half of the height.

  #oval {      width: 200px;      height: 100px;      background: #e9337c;      -webkit-border-radius: 100px / 50px;      -moz-border-radius: 100px / 50px;      border-radius: 100px / 50px;  }  

Triangle

triangle

HTML

In order to create a triangle in CSS, set up again a div with the ID name triangle.

CSS

To create a triangle, manipulate the border property. Manipulating the width of the border will give you different results at rotational angles.

  #triangle {      width: 0;      height: 0;      border-bottom: 140px solid #fcf921;      border-left: 70px solid transparent;      border-right: 70px solid transparent;  }  

Triangle Down

triangle_down

HTML

To create an inverted triangle shape using CSS, create again a div with the ID name triangle_down.

     <div id="triangle_down"></div>  

CSS

Creating an inverted triangle, we need to manipulate the border property of the bottom.

  #triangle_down {      width: 0;      height: 0;      border-top: 140px solid #20a3bf;      border-left: 70px solid transparent;      border-right: 70px solid transparent;  }  

Triangle Left

triangle_left

HTML

To create a triangle shape that faces left, set up again a div with the ID name triangle_left.

    <div id="triangle_left"></div>  

CSS

Creating a triangle that faces left, manipulate the border property of the right side.

  #triangle_left {      width: 0;      height: 0;      border-top: 70px solid transparent;      border-right: 140px solid #6bbf20;      border-bottom: 70px solid transparent;  }  

Triangle Right

triangle_right

HTML

In order to create a triangle shape that faces right, set up a div with the ID name triangle_right.

    <div id="triangle_right"></div>  

CSS

Creating a triangle that faces left, manipulate the border property of the left side.

  #triangle_right {      width: 0;      height: 0;      border-top: 70px solid transparent;      border-left: 140px solid #ff5a00;      border-bottom: 70px solid transparent;  }  

Diamond

diamond

HTML

To create a diamond shape using CSS, provide a div with the ID name diamond.

    <div id="diamond"></div>  

CSS

Creating a diamond can be displayed in many ways. Using the transform property along with rotate value will enable to display two triangles next to each other.

  #diamond {      width: 120px;      height: 120px;      background: #1eff00;  /* Rotate */      -webkit-transform: rotate(-45deg);      -moz-transform: rotate(-45deg);      -ms-transform: rotate(-45deg);      -o-transform: rotate(-45deg);      transform: rotate(-45deg);  /* Rotate Origin */      -webkit-transform-origin: 0 100%;      -moz-transform-origin: 0 100%;      -ms-transform-origin: 0 100%;      -o-transform-origin: 0 100%;      transform-origin: 0 100%;      margin: 60px 0 10px 310px;  }    

Trapezium
trapezium

HTML

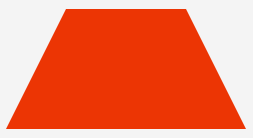
In order to create a trapezium shape using CSS, set up a div with the ID name trapezium.

    <div id="trapezium"></div>  

CSS

A trapezium can be displayed by setting up equal left and right border with a flat bottom.

  #trapezium {      height: 0;      width: 120px;      border-bottom: 120px solid #ec3504;      border-left: 60px solid transparent;      border-right: 60px solid transparent;  }  

Parallelogram
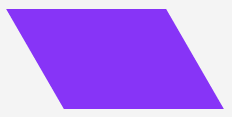
parralelogram

HTML

Creating a parallelogram shape using CSS will need a div with the ID name parallelogram.

    <div id="parallelogram"></div>  

CSS

To create a parallelogram shape, set up a transform value of skew to turn the element in a 30 degree angle.

  #parallelogram {      width: 160px;      height: 100px;      background: #8734f7;      -webkit-transform: skew(30deg);      -moz-transform: skew(30deg);      -o-transform: skew(30deg);      transform: skew(30deg);  }    

Star

star

HTML

In order to create a star shape using CSS will need a div with the ID name star.

    <div id="star"></div>  

CSS

Creation of a star is a strange manipulation of borders with the use of rotate value of transform. See code below.

  #star {      width: 0;      height: 0;      margin: 50px 0;      color: #fc2e5a;      position: relative;      display: block;      border-right: 100px solid transparent;      border-bottom: 70px solid #fc2e5a;      border-left: 100px solid transparent;      -moz-transform: rotate(35deg);      -webkit-transform: rotate(35deg);      -ms-transform: rotate(35deg);      -o-transform: rotate(35deg);  }    #star:before {      height: 0;      width: 0;      position: absolute;      display: block;      top: -45px;      left: -65px;      border-bottom: 80px solid #fc2e5a;      border-left: 30px solid transparent;      border-right: 30px solid transparent;      content: '';      -webkit-transform: rotate(-35deg);      -moz-transform: rotate(-35deg);      -ms-transform: rotate(-35deg);      -o-transform: rotate(-35deg);  }    #star:after {      content: '';      width: 0;      height: 0;      position: absolute;      display: block;      top: 3px;      left: -105px;      color: #fc2e5a;      border-right: 100px solid transparent;      border-bottom: 70px solid #fc2e5a;      border-left: 100px solid transparent;      -webkit-transform: rotate(-70deg);      -moz-transform: rotate(-70deg);      -ms-transform: rotate(-70deg);      -o-transform: rotate(-70deg);  }  

Star (6 points)

star-6pt

HTML

The markup for six points star shape using CSS will need a div with the ID name parallelogram.

    <div id="star_six_points"></div>  

CSS

Unlike the regular star with five points, the six point star will be manipulated using the border properties. Create two sets of shapes and then combine them as one.

  #star_six_points {      width: 0;      height: 0;      display: block;      position: absolute;      border-left: 50px solid transparent;      border-right: 50px solid transparent;      border-bottom: 100px solid #de34f7;      margin: 10px auto;  }    #star_six_points:after {      content: "";      width: 0;      height: 0;      position: absolute;      border-left: 50px solid transparent;      border-right: 50px solid transparent;      border-top: 100px solid #de34f7;      margin: 30px 0 0 -50px;  }   

Pentagon

pentagon

HTML

To create a pentagon, set up a div with an id of pentagon.

    <div id="pentagon"></div>  

CSS

Creating a pentagon needs two elements that go into creating one. First create a trapezoid shape and then add a triangle shape on the top of it.

  #pentagon {      width: 54px;      position: relative;      border-width: 50px 18px 0;      border-style: solid;      border-color: #277bab transparent;  }    #pentagon:before {      content: "";      height: 0;      width: 0;      position: absolute;      top: -85px;      left: -18px;      border-width: 0 45px 35px;      border-style: solid;      border-color: transparent transparent #277bab;  }  

Hexagon

hexagon

HTML

In order to create a hexagon, set up a div with an ID of hexagon.

    <div id="hexagon"></div>  

CSS
There are different ways to create a hexagon. One way to create is almost identical like the creation of pentagon. First create a rectangular shape and then add two triangles on the top.

  #hexagon {      width: 100px;      height: 55px;      background: #fc5e5e;      position: relative;      margin: 10px auto;  }    #hexagon:before {      content: "";      width: 0;      height: 0;      position: absolute;      top: -25px;      left: 0;      border-left: 50px solid transparent;      border-right: 50px solid transparent;      border-bottom: 25px solid #fc5e5e;  }    #hexagon:after {      content: "";      width: 0;      height: 0;      position: absolute;      bottom: -25px;      left: 0;      border-left: 50px solid transparent;      border-right: 50px solid transparent;      border-top: 25px solid #fc5e5e;  }  

Octagon

octagon

HTML

Creating an octagon, will require a div with an ID octagon.

    <div id="octagon"></div>  

CSS

A octagon can be a hack too. First create two identical trapezoids and then put two triangles from each side. Although there are also some other ways to do this, this is the best way to do it.

  #octagon {      width: 100px;      height: 100px;      background: #ac60ec;      position: relative;  }    #octagon:before {      content: "";      width: 42px;      height: 0;      position: absolute;      top: 0;      left: 0;      border-bottom: 29px solid #ac60ec;      border-left: 29px solid #f4f4f4;      border-right: 29px solid #f4f4f4;  }    #octagon:after {      content: "";      width: 42px;      height: 0;      position: absolute;      bottom: 0;      left: 0;      border-top: 29px solid #ac60ec;      border-left: 29px solid #f4f4f4;      border-right: 29px solid #f4f4f4;  }        }  

Heart

heart

HTML

To create a heart shape CSS, let's first create a div with an ID name of heart.

    <div id="heart"></div>  

CSS

Heart shape can be hard to do but it can be done by rotating elements from different angles and changing the transform-origin property to enable the changing of the position on transformed element.

  #heart {      position: relative;  }    #heart:before,#heart:after {      content: "";      width: 70px;      height: 115px;      position: absolute;      background: red;      left: 70px;      top: 0;      -webkit-border-radius: 50px 50px 0 0;      -moz-border-radius: 50px 50px 0 0;      border-radius: 50px 50px 0 0;      -webkit-transform: rotate(-45deg);      -moz-transform: rotate(-45deg);      -ms-transform: rotate(-45deg);      -o-transform: rotate(-45deg);      transform: rotate(-45deg);      -webkit-transform-origin: 0 100%;      -moz-transform-origin: 0 100%;      -ms-transform-origin: 0 100%;      -o-transform-origin: 0 100%;      transform-origin: 0 100%;  }    #heart:after {      left: 0;      -webkit-transform: rotate(45deg);      -moz-transform: rotate(45deg);      -ms-transform: rotate(45deg);      -o-transform: rotate(45deg);      transform: rotate(45deg);      -webkit-transform-origin: 100% 100%;      -moz-transform-origin: 100% 100%;      -ms-transform-origin: 100% 100%;      -o-transform-origin: 100% 100%;      transform-origin: 100% 100%;  }    

Egg

egg

HTML

In order to create an egg shape CSS, first create a div with an ID name egg.

    <div id="egg"></div>  

CSS

An egg shape is almost identical with the oval shape except that the height is a bit higher than the width and the radius is carefully manipulated to get a good result.

  #egg {      width: 136px;      height: 190px;      background: #ffc000;      display: block;      -webkit-border-radius: 63px 63px 63px 63px / 108px 108px 72px 72px;      border-radius: 50% 50% 50% 50% / 60% 60% 40% 40%;  }   

Infinity

infinity

HTML

To create an infinity shape in CSS, create a div with an ID name infinity.

    <div id="infinity"></div>  

CSS

Infinity shape can be achieved by carefully manipulating the borders and setting the angle of the circle like shape.

  #infinity {      width: 220px;      height: 100px;      position: relative;  }    #infinity:before,#infinity:after {      content: "";      width: 60px;      height: 60px;      position: absolute;      top: 0;      left: 0;      border: 20px solid #06c999;      -moz-border-radius: 50px 50px 0;      border-radius: 50px 50px 0 50px;      -webkit-transform: rotate(-45deg);      -moz-transform: rotate(-45deg);      -ms-transform: rotate(-45deg);      -o-transform: rotate(-45deg);      transform: rotate(-45deg);  }    #infinity:after {      left: auto;      right: 0;      -moz-border-radius: 50px 50px 50px 0;      border-radius: 50px 50px 50px 0;      -webkit-transform: rotate(45deg);      -moz-transform: rotate(45deg);      -ms-transform: rotate(45deg);      -o-transform: rotate(45deg);      transform: rotate(45deg);  }  

Comment Bubble

comment-bubble

HTML

In order to create a comment bubble shape in CSS, create a div with an ID name comment_bubble.

    <div id="comment_bubble"></div>  

CSS

A bubble comment shape can be created by creating a rectangle and giving it a border radius, then place a triangular shape like on the left side.

  #comment_bubble {      width: 140px;      height: 100px;      background: #088cb7;      position: relative;      -moz-border-radius: 12px;      -webkit-border-radius: 12px;      border-radius: 12px;  }    #comment_bubble:before {      content: "";      width: 0;      height: 0;      right: 100%;      top: 38px;      position: absolute;      border-top: 13px solid transparent;      border-right: 26px solid #088cb7;      border-bottom: 13px solid transparent;  }  

Pacman

pacman

HTML

To create a pacman shape in CSS, create a div with an ID name of pacman.

    <div id="pacman"></div>  

CSS

Creating a pacman is a hack too. Just manipulate the border and the radius to create an opening on the left side of the circle.

  #pacman {      width: 0;      height: 0;      border-right: 70px solid transparent;      border-top: 70px solid #ffde00;      border-left: 70px solid #ffde00;      border-bottom: 70px solid #ffde00;      border-top-left-radius: 70px;      border-top-right-radius: 70px;      border-bottom-left-radius: 70px;      border-bottom-right-radius: 70px;  }  

Final Words

There are a lot of advantages in using CSS shapes than putting images on your website. You can use shapes today as a part of your progressive workflow, though they have acceptable fallback in non-supporting browsers especially with the Jurassic IE browsers.

Though you can build shapes from scratch, there are some sites, I would recommend for you to see that generates CSS shapes for you. Check out the following sites.

And that’s really it. Hope you enjoyed this tutorial and let me know in comment section if you have any other way to create similar result like the CSS shapes you see in the demo.

Monday, July 28, 2014

1stwebdesigner

1stwebdesigner


Web Designer vs Web Developer Infographic

Posted: 28 Jul 2014 06:00 AM PDT

There are a lot of articles that differentiate web designers from web developers. Commonly, they talk about the difference of the two. Some, even encourage debates on whether designers should code and developers should design. Instead of reading a lengthy article on the difference of these two, why not checkout this cool web designer vs web developer infographic created by Rudolph Musngi for 1WD.

All of these data can sometimes make us feel confused about what the difference of developers and designers really is. So, we made an infographic (yay!)  to creatively illustrate how they differ and which profession your skill sets might belong. Let's take a look at it:

webdesignvsdevt